I will get caught up.... just need to find some time to do so.
We camped at Assateague Island in July and had a great time enjoying the beach, kayaking, meeting friends, and relaxing. In August, we managed to get a trip to Knoebels in for a few days before the kids started their new school. Then, while there, the wives found out about the craft fair weekend in October at Knoebels, with 350+ vendors expected. They found out about the sites and everything, and next thing we knew we were committed to going back in October. We just returned from this last trip, and have some catching up to do. I'll try and get each posted shortly with some summary photos. 2015 looks to be a season of camping again now that we will be past this transistion in our lives, so expect more posts to follow on a regular basis.
Schaffer Family
Tuesday, October 7, 2014
Tuesday, July 15, 2014
A little Wiring Project
This week I was getting ready to open the camper and prepare for our upcoming trip. As I went to the camper and unlocked the latches, I prepared to use the power lift to raise the roof. Up goes the switch,... but ,... Up goes the roof it did not. I forgot to disconnect the terminal from the battery and the LP/CO detector drained the battery down to 8.4 Volts!! Yikes! I hope I didn't toast the battery.
 First, I nursed the battery back to 11 volts on a steady rate charge, and then switched over to a bulk charge rate to bring it back. Took a while, but managed to get back to 12.4 volts (after resting 2 hrs) at the end of the day. Next day, placed on the solar charger and let the sun do the work and the battery is back to 12.7 / 12.8 V at rest.
So,.. learned my lesson. Time to get wiring a disconnect switch that I've had planned for a while now. Since we are going to be off the grid and using solar panels to recharge the battery, I need a way to monitor the voltage as well as isolate the battery for charging, or isolate it from the parasitic draw of the LP/CO detector when in storage (without disconnecting the terminals). The Blue Sea 6007 marine switch will do just that.

Off - disconnects everything from the battery
1 - Battery connected to camper as currently wired. All functions work, needed to be in this position for towing to have brakes active and permit charging of the battery during tow.
2 - Battery disconnected from Camper, Solar charge controller connected to Battery for charging via solar panels.
1+2 - at a camping location, solar panels in use and connected, camper in use for LED lighting and water pump.
To monitor the voltage state of the battery, a Single Pole switch is going to be wired in the system off the porch light, with an LED volt meter to read the voltage. This saves me from ducking under the bed, removing the battery cover, and placing my multi-meter across the battery terminals. Important to note here is that when in Position 1 I'll be able to read the battery voltage, but if in 2 or 1+2, I'll be getting the charge voltage to the battery.
To make this nice, I found a solid receptacle blank cover and got to work with my dremel. A few cuts later and melted plastic, I was able to clip in my meter and switch and prepare the leads.
So now I will have to mount the volt meter in the camper when I open it up next prior to camping. I'll post an updated photo of the finished condition in working order from our camping trip.
So,.. learned my lesson. Time to get wiring a disconnect switch that I've had planned for a while now. Since we are going to be off the grid and using solar panels to recharge the battery, I need a way to monitor the voltage as well as isolate the battery for charging, or isolate it from the parasitic draw of the LP/CO detector when in storage (without disconnecting the terminals). The Blue Sea 6007 marine switch will do just that.
Off - disconnects everything from the battery
1 - Battery connected to camper as currently wired. All functions work, needed to be in this position for towing to have brakes active and permit charging of the battery during tow.
2 - Battery disconnected from Camper, Solar charge controller connected to Battery for charging via solar panels.
1+2 - at a camping location, solar panels in use and connected, camper in use for LED lighting and water pump.
 |
| Mounting Box |
 |
| Switch Fit Up |
 |
| Mounted to Camper, In Position 1 as shown. 4 Ga wire to Battery |
To make this nice, I found a solid receptacle blank cover and got to work with my dremel. A few cuts later and melted plastic, I was able to clip in my meter and switch and prepare the leads.
 |
| Completed Dremel Work |
 |
| Nice Clean Installation |
So now I will have to mount the volt meter in the camper when I open it up next prior to camping. I'll post an updated photo of the finished condition in working order from our camping trip.
Thursday, July 10, 2014
Still here,.....
It has been a very very long spring and summer, and since this is a camping blog,..... there hasn't been any posts since there hasn't been any camping. But, that is hopefully going to change next week as we finally get out and return to Assateague Island in Maryland.
Here is a sneak peak of what we have been up to though....
Here is a sneak peak of what we have been up to though....
 |
| Before,.... |
 |
| After! |
Wednesday, May 28, 2014
Camper Spring Service
Spring Lubrication Tips
Each spring it is time to inspect the camper and prepare for the journey ahead. A properly maintained camper and lubricated one will help things go a long way without trouble. Also, the more you know about the camper the better you are at finding something that doesn't seem right or operate the way it has in the past. So, this is a good time to talk about dusting off the camper and lubrication.
Things we do:
- Main power winch - pack worm gear with grease (Peak 2) and check the stop limit switches for tightness and operation
- Lubricate the cable drum and cable on it with WD40
- Spray the pivot joints of the stabilizers with WD40
- Spray the threaded rod of the stabilizer with Silicone Lube, which is a dry lube and doesn't attract dirt as much.
- Grease the main wiffle tree below the camper at the front and rear grease points
- Add oil to the spring lifter posts while the camper is down
- Raise the roof, and then spray the lifter posts with dry silicone lube along the tracks
- Clean the door hinges to make sure they didn't get full of grit
- Add a few more pumps of grease to the main wiffle tree now that things have moved during raising the roof.
- Lubricate the wheel hubs and bearings (nice with the EZ lube hub system)
- Check operation of the hitch coupler and lock, lube if needed.
 |
| Closed, with tools and lubrication items ready to go |
 |
| Current products we use for most of the camper servicing |
Tuesday, May 20, 2014
Wahoo! Camping is here!
No Snow,... just lots of wind and rain this spring. Luckily our camper has stayed dry inside and protected. I've been lax lately about posting, since we are working so hard on our new house to renovate and to get our current house ready to put on the market. Finally, we will be getting a chance to open the camper and enjoy the comforts of camping without the cell phones on and work papers everywhere. We need a rest.
Some upcoming posts will be about our camping trip, spring cleaning, and lubrication of the camper parts. More to come soon!
Some upcoming posts will be about our camping trip, spring cleaning, and lubrication of the camper parts. More to come soon!
Wednesday, February 5, 2014
This Winter Sucketh!
 |
Our Poor Flagstaff Camper,...
Our camper is holding out, dreaming of spring sunshine and warm beach side camping at Assateague Island,.... but first, this snow has got to go! We have been getting close to the snowfall records in the area for the past few years, passing many in the last decade. 6-10 inches at a time, we are getting pretty tired of it.
Sunday, January 5, 2014
Planning for Spring..... Can't get here fast enough!
So, as I sit here and type, we had 8 inches of snow a few days ago which crippled the area for a bit till they got a good chance to clean things up. The camper survived well, with the wind blowing most of the snow off of it in the day that followed. Now, it is freezing rain that is soaking into the snow, freezing on top, freezing the sidewalks,... and making it miserable.
So,.. why not think about the camping season and what we can do this year!
I managed to score a great deal on the Harbor Freight 45W Solar Panel system with charge controller on New Years Day during the big sale. Lowest price that I have seen for it when I used the 25% coupon too! That got me thinking on a rainy day like this, what is the best way to hook everything up for our camper and our needs. The Solar system will only be used a few times a year when we dry-camp out back, camp on the beach of Asseteague Island, or find another new place to go. The rest of the time we will have the opportunity to plug into the campground shore power and have the converter charge our deep cycle battery.
 I read a bit about how the systems work and I wanted to add a way to disconnect the power from the battery to the camper as well, so that when sitting for a few weeks between trips the LP and CO detectors can't draw on the battery. Doesn't seem like much, but after 3-4 weeks it makes a difference when you go to power lift the camper roof.
Bring in the Blue Sea battery switch. This is a marine grade switch used on boats to select between two points of battery source, or both, and would be a perfect fit I think for our objective. If I wire the "common" terminal as the 12V battery, then option 1 can be the camper and option 2 can be the solar array. If we need, I can even select "1+2" and have the camper and solar array connected to the battery at once.

Typically, we will operate at Position 1, which gives us all the features we have connected now as if we are directly connected to the terminal. Battery is connected to the Camper Fuse system and Converter. If at a campground with hookup, the battery can be maintained thru the converter in the camper and charged.
Parking for the weeks between trips, I can select Position 2, but NOT have the solar system connected. This would effectively be my battery disconnect position.
Camping at Asseteague Island for 4 days with no hookups at the site, we can be in Position 2 and connect the solar controller and array to charge and maintain the battery during the day. Set to Position 1, the camper lighting, fan, and water pump can be active when we are in the camper in the evening and the solar array disconnected.
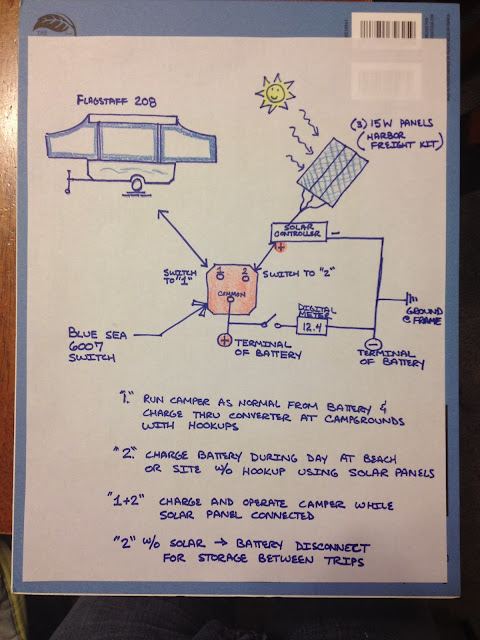
I still have to read up, but doesn't seem to be any reason why we can't be in Position "1+2", when connected to the solar array (not connected to shore power at a campground), so that the water pump can be run and the battery can have a load on it / charge on it at the same time.
In order to keep tabs on the battery voltage, a simple digital LCD volt meter will be wired across the battery terminals with a single pole switch so that I can turn on / off the meter to see the voltage of the battery. It is always a good idea to keep an eye on the voltage, but you also have to remember to read it at rest, which may mean an hour after disconnecting the solar array. You can read it while charging, but it is effectively reading the solar panel voltage output/charge, and not the actual state of the battery.
So,.. why not think about the camping season and what we can do this year!
I managed to score a great deal on the Harbor Freight 45W Solar Panel system with charge controller on New Years Day during the big sale. Lowest price that I have seen for it when I used the 25% coupon too! That got me thinking on a rainy day like this, what is the best way to hook everything up for our camper and our needs. The Solar system will only be used a few times a year when we dry-camp out back, camp on the beach of Asseteague Island, or find another new place to go. The rest of the time we will have the opportunity to plug into the campground shore power and have the converter charge our deep cycle battery.

Bring in the Blue Sea battery switch. This is a marine grade switch used on boats to select between two points of battery source, or both, and would be a perfect fit I think for our objective. If I wire the "common" terminal as the 12V battery, then option 1 can be the camper and option 2 can be the solar array. If we need, I can even select "1+2" and have the camper and solar array connected to the battery at once.

Typically, we will operate at Position 1, which gives us all the features we have connected now as if we are directly connected to the terminal. Battery is connected to the Camper Fuse system and Converter. If at a campground with hookup, the battery can be maintained thru the converter in the camper and charged.
Parking for the weeks between trips, I can select Position 2, but NOT have the solar system connected. This would effectively be my battery disconnect position.
Camping at Asseteague Island for 4 days with no hookups at the site, we can be in Position 2 and connect the solar controller and array to charge and maintain the battery during the day. Set to Position 1, the camper lighting, fan, and water pump can be active when we are in the camper in the evening and the solar array disconnected.

I still have to read up, but doesn't seem to be any reason why we can't be in Position "1+2", when connected to the solar array (not connected to shore power at a campground), so that the water pump can be run and the battery can have a load on it / charge on it at the same time.
In order to keep tabs on the battery voltage, a simple digital LCD volt meter will be wired across the battery terminals with a single pole switch so that I can turn on / off the meter to see the voltage of the battery. It is always a good idea to keep an eye on the voltage, but you also have to remember to read it at rest, which may mean an hour after disconnecting the solar array. You can read it while charging, but it is effectively reading the solar panel voltage output/charge, and not the actual state of the battery.
Subscribe to:
Comments (Atom)